▼
Sunday, January 25, 2009
Wax Museum Project for my sister....
I've been helping my lil' sis with her school project for the majority of this weekend. They open up a "wax museum" in the school and the students choose an important social figure, deceased or not, to pose as. This year she chose Princess Diana. I just wanted to share this portrait I made of Princess Diana....it's pretty good for my first one lol!
Saturday, January 24, 2009
Some Sample Handmade Cards
I can never figure out what is easier for the reader...for me to put the photo captions on top or at the bottom....so I will put them on the bottom of each pic...Comment if you prefer the other way! Remember all these cards can be revamped by changing the colors papers and shapes!
These are some simple Tree Cards I made....These can be used as a gift to someone with like 10-15? as a set, or whatever amount you choose. I did some old school (literally) techniques by folding my paper in half and cutting out half the shape of the tree. I used fun Christmas themed paper.
This is a Snowman card...I bought the snowman piece and attached it to the cardstock, but I am sure this snowman is easy to make out of felt/fleece.
This is a cute shaker card, I followed the directions from one of my magazines (If I find it online I will post up here, or if you ask...Ill go find it online) I used flowers to decorate this card, but you can use any design or motif!
Same idea as the Snowman card, but this one is Santa!
This is a Birthday card. I made a Birthday Party hat with some decorative paper, and used some fluffy trimmings for the top and bottom of hat.
Again back to old school basics....who didnt do this angel in school? I just spruced it up with some cute festive paper and cute ribbon!
Inauguration Day 01.20.2009
I promise to put up some posts this weekend!
I will never create momentum on this blog if I dont keep posting up stuff! Its just that I havent had a chance to get artsy in a lil' while....a few too many distractions in my life recently some good some atrocious!. Heres a good...a "Fab!" I went to DC on Tuesday 01.20.09 for the Inauguration of President Barack Obama and we took plenty of pics and I picked up some souvenirs, so that will be a scrapbook page I PROMISE to work on this weekend and post up shortly. I have this one from Election night, we were at the State Office Building in Harlem, where Senator Bill Perkins threw a huge party! I went with some students and an adult volunteer to get some coverage. (Check out the video here...wwww.HarlemLIVE.org Click on the Election Night 2008 video, scroll down the videos are on your left hand side....while you're at it check out the rest of the stuff the students do!) The second page is not finished...Im going to add some embellishments and make it a digi and regular paper scrapped layout.
Back to cleaning my apartment, then I can sit down and let the creative juices flow!
Sunday, January 18, 2009
Mirrors in Progress
I found these mirrors outside in an abandoned cart....The pink one was painted an ugly white....I love the shape of it...but kinds hate that decoration it had...bow looking thing....I am going to see if I could remove that and replace it with some letters or something. The blue one was ugly canary yellow with bronzed antique brushed over the top...as shown in the pic...i am painting this one an island blue...havent decided if i am going to brush another color over it or not...im really liking how it looks one solid color. Will post up pics when its finished.
Wednesday, January 07, 2009
More Cases....
Pink with white flower....this is my favorite right now. The felt had a crease in it...I learnd my lesson about how important it is to store felt FLAT!!!...But the creases worked in my favor b/c thats why how I came up with my design (trying to cover it up)
I used a button on the closure for this one...I am running out of embellishments need to go and pick some up!
This one is just simple and elegant.
I had this Cat Print Felt and decided to make a case out of it.
This one is a close second for favorite of mine. I LOVE anything Pink and Black!
Sunday, January 04, 2009
It's hard for me to make a gift for a boy!!!!
I have a student who adores himself and a mirror I made for myself that hangs near my desk. So i told him I would make one for him for his Bdaii and here it is. I always make things for girls....its a challenge for me to make things for boi's....I am use to glitter, and flowers and bling....But I made it work. that's his nickname on the mirror and I am so serious when I say he loves to look at himself....so I had him send me some of his favorite pics so I could use them as border around the frame. there weren't any "A's" left at the store so I had to improvise with some "V's" I just took a piece of black Pleather ribbon and made the small stick to turn the V into an A. I spray painted the Letters with gold glitter....guys like bling right? lol There is a mirror that goes in the middle of this frame....I'll attach it when I pack it up to give it to him.
Random Stuff to Share
As you can tell I LOVE Target's $1 spot!!!....I found these really cuuuute piggii banks there (the bigger one was $2.50...but still a BARGAIN!) As you can tell too I LOVE Pink....
I was tired of loosing all my hair clips....so I nailed a nice piece of ribbon to my wall near my mirror and created a place for me to leep all the clips and never go crazy looking for them again! Yah!!! lol
My Favorite Scrapping, Art, Craft, Storage Item (s)....
I love all my stuff but I especially ADORE my Ikea Storage unit. When I moved into this apartment I was so excited that I was FINALLY going to have a seperate space for all my scrapbooking and art supplies. My space is still a continuous work in progress....I'll update you as I update the room....
I think this storage unit is any Creative Artists DREAM! Everything has a place (or cubby) and there is a place (or cubby) for everything!!! Love it....
I also Adore these small storage units from Ikea also. I have finished painting them yet...but you get the direction im going in)
This is my Favorite...I almost changed the next one to look like this lol. I used a all Heidi Swapp products for this!! I used her Acrylic Damask Stamp (I love this stamp dearly...but it is unfortunately one of the stamps I told I received yellow I used color box silver paint (ok one thing not Heidi's) I also used her paper....I LOVE Houndstooth print also....I LOVE LOVE LOVE this piece!
This one is Cute too...Used some paper from K and C and adhered it to the drawers.
Some Random Wall Decor
I made the flower with felt and used fabric paint to decorate the edges and adhere the button....i actually made a mistake with the button so I covered the edge of the button with yellow fabric paint...good looking mistake if you ask me lol.
After painting this piece I adhered some letter stickers and spread glue over the whole left side...I then sprinkled glitter over the glue and removed the letter sickers after 10 minutes or so (before the glue dried completely)
This has to be my favorite piece I have ever made...I used a canvas for this, painted it pink and used elmers glue to make the heart....I put glitter on top of the glue and voila! Fab-U-losity!!! lol
Altered Frames
Just some altered frames....I bought a 3 pack at Targets $1 Spot (the pack cost me $2.50)....I hot glue gunned some ribbon (also from the $1 spot at Target) to the edges. They came with the ribbon on the back to hang....I think its a cute way to hang photos.
Make these gifts!!!
Buy some frames at your local 99cents store and add all sorts of embelishments to them to personalize them for the recipient.
BlackBerry Pearl Handmade Pink n Black Case
Purple Glitterii itouch or iPhone Felt Case
Most Delicious Delicioso Budin Bread Puddin You will Ever have....
According to my (and my family's) tastebuds! lol Ok so here is the Recipe.....
BUT FIRST Please Keep in my I am in no way a Chef....a baker....a foodie....I just experiment at home and more times than not I create delicious foods!
Ingredients:
-1 small loaf of WHITE bread (with 4 extra slices)...preferably a bit stale, but when I made it most recently I used bread that was "best by" the date I baked this goodness.
-1 can of COCO Lopez, (usually found in "urban" groceries/Deli's where there are Hispanics in the community....just my experience...might be found everywhere but i dunno!) It is the equivalent of CREAM of Coconut....not Coconut milk.
-2 cans of Evaporated Milk...I used carnation
-1 can of Sweetened Condensed Milk....I used Carnation here also.
-8 eggs...white shelled ones (i dont think it matters what color shells....Im just giving you what I used!)
-Sprinkling of Cinammon (im sure its spelled wrong....you know what I mean) lol...To taste
-about a Tablespoon and a half of pure vanilla extract.....to taste....be careful a bit tends to go a LONG way
-Some sugar for the caramel...or dulce at the bottom..I used about 3/4ths of a cup of White Suga
I used a disposable aluminum pan to cook it....sry dont know the exact measurements of it...but the middle sized one....see if this pic helps?
(Some folks like rasins in thier Budin...I hate them....if you were to add them you would soak them in water for a but then pour them into the pan after you add the caramel to the pan.)
Here are the steps....
Butter your baking dish....the bottom and sides. Oh yea and turn on your oven to 375 Degress Celsius. In a saute pan pour in you suga add like 2 Tablespoons of water....(VERY IMPORTANT....its trial and error here with this caramel stuff.....when i first did it I added WAY too much water and boy did that turn into a mess!....also let the suga MELT-BOIL....if you keep stirring it before it begins to melt its clumps up and I think it takes longer....but DO keep an eye on it and stay right by the pans side) Ok so when it begins to boil and begin to turn an amberish color begin to stirr it with a wooden spoon. Still until all the suga is a beautiful amber color...almost honey. It should be like the consistensy of water. Pour it into the buttered aluminum tray. If you dont have an even surface (or floor like me) move the caramel around until it gets a bit sticky and sticks to the bottom of the entire pan. Now this next step can be done by you or if you have someone in the house (that will indulge in this dessert ina couple of hours have them lift a finger and help ya out)....break the bread slices apart and into the pan....just kinda shred them they dont have to be small pieces but they shouldnt be huge pieces. Now blend all the wet ingredients together, the CocoLopez, Milk (s), vanilla, eggs, and sprinkle in some cinammon. Once it is all blended (which i find best to do ina blender b/c the condensed milk and coc lopez have thick consistencies.) Pour it over the bread in the pan. Make sure al the bread gets soaked....it decreases the chances of have burnt bread pieces on the top. I like to sprinkle some cinamon on top of the mixture when its in the pan....just prefence you dont have too.
Place in oven and bake for about an hour.....It's done when an inserted knife, toothpick, or fork end comes out clean, just like a cake. (The top of mine was bloated when I removed it from the oven....it resembled a large souffle....after I let it rest for about 25 minutes on the cooling rack....it deflated.)Stick it in the fridge to get completely cold.....about an hour or two depending on your fridge? Serve and enjoy!!!!....Yummiii Add whipped cream if you wish
Maxi cant help but want some!
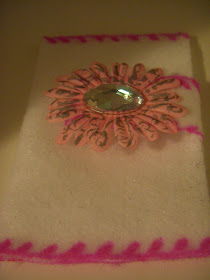
Felt iTouch/iPhone Case with Pink Flower
I LOVE the way it looks like real stitchin'
I took a silver sharpie and added some swirls for design on the flower....it was looking way to plain.
I liked the angle in this pic
Pic showing off the iTouch in the Case
Showing you the Velcro
Pic without Flash to show you the closes to the truest color of the case....I also like the angle of this pic.
I whipped this iTouch case for my sister in about 45 minutes....maybe even only half an hour. I used white felt (If you could get your hands on some fleece material I suggest you use that, it's softer for the screen) I couldnt find my thread (and am not so confident in my sewing skills not even for such a basic stitch) so I used a pink Sharpie to mimic a stitch around the edges, I think it gave it a cool effect. I used my hot glue gun to seal the side edges and velcro to keep the strap in place.
ALTER THIS
You can make this case for anything really...your phone, another iPod, Mp3/4 Player, a mini wallet, camera, let your creative juices flow! Add different decorations use some fabric paint, markers, more felt, REAL thread and needle, the ideas and possibilities are endless.
You can use this as a gift, or even as a special treat for yourself.
I am making more, and promise to document the whole process and include a how to on this blog!