Monday, December 03, 2012

Simple Phone Cases and Wallets

No Sew Phone cases and Wallets. I'll create a tutorial for these soon, when I am done with Finals. Here is the Tutorial! 

I used Fabric glue to adhere all the sides and rhinestone trim. I used nail polish for the color. 
 This one has three studs. 
 Here is the inside.

 Cell Phone Case with a Ribbon around it to keep the flap closed. 

Fits my iphone perfectly.
 Heart shaped small wallet.
 In my Ikea picture frame.

Saturday, November 24, 2012

Flower Coin Purse D.I.Y.


I found these cute plastic coin purses at the local dollar store and knew I could spruce them up. I didn't create a step by step tutorial but I promise it's super easy to do!


Here is what you need. The purse, Fabric of your choice, fabric scissors, a paint brush or foam brush (not pictured) and Mod Podge (also not pictured). I used regular Mod-Podge, although you could use the Fabric Mod Podge. 

Here are the basic steps...

1. Cut out your flower from the fabric. (or whatever you decide to use)
2. Apply Mod Podge to the back of the fabric, then put the fabric onto the purse. Smooth it out as much as possible. I used a paint brush to apply the Mod Podge.
3. Paint over the entire flower (or whatever you used) with Mod Podge. Make sure to go over the edges of the fabric to seal it down. Have fun with it, you can add different kinds of fabric and even cover the whole thing if you wanted to.
4. You're done!


Enjoy! Share yours with me if you try this, I would love to see what you come up with. 

Monday, August 27, 2012

Pink Neck Candy


Here are the most recent necklaces I have made. One has translucent pink beads on a gold chain. The other if a soft pink pendant with a cluster of pink pearls above it. It also hangs on a long gold chain. 

Individual pictures of each below. 

Sunday, August 19, 2012

Neon Black and White Earrings


I have a ton of sew on rhinestones and am constantly trying to figure out what to do with them. I made these earrings. They are very bold and while I couldn't pull it off wearing them maybe someone out here could get inspired for their own set? 

Below are the original pictures individually. 

Wednesday, August 15, 2012

Testing a higher quality .gif


Just practicing making .gifs in photoshop. 

More Fabric flower Necklaces


Single fabric flower necklace with a cluster of pink beads. Below are close ups of each picture. I also used this tutorial as a guide to make this necklace. 


Sunday, August 12, 2012

Fabric Flower Necklace with White Pearls


I used this tutorial as a guide for this necklace. I did not make the fabric flowers myself, I purchased it as a trim from a local trimming shop.

Hair Comb with Rhinestones Tutorial


Here is an easy tutorial on how to make this cute Rhinestone hair comb. 


These are the materials you will need:

Hair Comb

Rhinestone Trim 

 Cotton Thread (you can also use suede or embroidery thread) 

not pictured Hot Glue Gun and scissors 


Take your hair comb and gently spread out the "teeth" of the comb. Not to much, just enough to allow the thread to pass easily. 


Use your hot Glue gun to attach the rhinestone trim. 


Start wrapping the trim with your thread. You can either knot it at the beginning or tuck the starting strand under your wraps. I've included a picture below of the back so you can see what mine looks like in the back. You can also glue the strand behind the rhinestone trim to secure it, then begin to wrap. I did three wraps each between the rhinestones, feel free to do as many as you like. 


When you reach the end, knot the string and cut it off. 


Here is what the back of mine looks like. My starting point is on the right side of this picture. 


Here is the final product! 

Friday, August 10, 2012

DIY Hair Comb with Rhinestones


Testing out a .gif I made on this blog. Detailed tut coming soon!

Wednesday, July 25, 2012

How to Get Perfect Shapes on your Nails Update!


I made an update for the "How to get perfect shapes on your nails" Post (original). It's a much simpler design and has very easy to follow steps. 


I also created this little mini quick reference "cheat sheet" for the steps. 


These are the materials you will need. Hole Puncher(s) I found smaller heart one at the dollar store, Nail polishes and masking tape (painters tape works also and I find it easier to work with thin tape).


Paint your nails with the base color you chose. Let them dry completely! This is important because you avoid smudges. 


Punch out your shape with the hole puncher. It may be tricky because of the stickiness of the tape, just be gentle when tugging. Then attach the tape to your nail firmly, you want to prevent the polish from bleeding. 


Apply polish over your shape. Gently pull off the tape before it dries. Be fun and creative in this step, add dots, glitter, leopard print anything that comes to mind in this step. Its easy to do it because the masking tape is covering the nail and its almost impossible to mess up! I stayed simple for this tut. 


Apply your top coat and you're done! 


Here is a close up look of the heart with the glitter. 

Another close up.

Monday, July 23, 2012

Floral and Lace Jewelry Holder and Wall Art


I first saw this tutorial on Pinterest. I fell in love with it! I thought what a clever and cute way to display jewelry and use as wall art. Here is my version of the lace jewelry holder. I made a mini tutorial for it. 


Here is what you will need. One Embroidery Hoop (your choice of size they come super small and super big), Paint (color that tickles your fancy- I used Acrylic paint),  Fabric, Lace, trimming (I used a rhinestone trim) not pictured- a paint brush, fabric scissors and a hot glue gun.


Paint your Hoop. You only need to paint the outside hoop, but if you prefer (or are doing this without the background fabric, then paint both) 


Fit both the fabric and lace over the inside smaller hoop. Place the larger hoop over all the fabric, and tighten the screw on top. Pull the fabrics from the back, gently, so they are snug and firm. 


Then, I trimmed off all the excess fabric with my fabric scissors. (Make sure you use fabric scissors or really sharp ones so you have a clean edge) You can leave it just like this, if you want. It's super cute as is. But I love sparkle and wanted to add some rhinestone trim to it. 


I used a hot glue gun and went around the hoop slowly adhering the trim. 


Here is how it looks from the side. 


and Viola! A Cute Floral and Lace Jewelry Holder. 


Here is a close up shot- it is great to use as a background for jewelry shots too! 


Tuesday, July 17, 2012

Birthday Nail Art Wheel

Fun Birthday themes nail art wheel. I'm still practicing my Nail Art pen skills so there are a few squiggly lines, or dots to close to each other but overall I am thrilled with these designs!

Sunday, July 15, 2012

Leopard Print with Gold French and Stripes


This is my favorite set of nails that I've done. Varying shades of pinks with gold and glitter. If you want to see more of my nail designs I usually post tons of them on Instagram. Find me under SellzCuteThings.

Saturday, July 14, 2012

FishTail Nails

I am absolutely in love with Fishtail nails. They are super easy to do and look like they took ages to create! I used this tutorial. 


Below is a Fishtail Nail wheel I made of a bunch of my favorite colors. I hope you like it! 


Monday, March 12, 2012

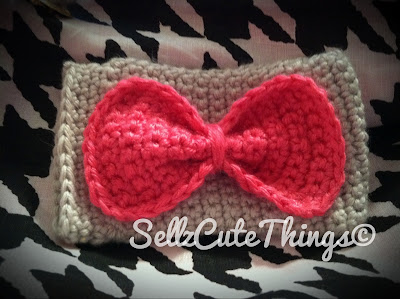
Cute Crochet Pink Bow iPhone Cozy (case)

My iPhone has been begging for a cute case...I've searched and searched and couldn't find one I was happy with, so I made one. Here she is....
Crochet Bow iPhone Case Cozy Easy Pink
I made a tight gray case- all single stitches. Then made a huge pink bow for the middle of it. I am going to use clear thread to stitch the bow ends down- they keep flipping up a bit. Below is a picture of it with some sparkles using the photo glitter app.