Wednesday, July 25, 2012

How to Get Perfect Shapes on your Nails Update!


I made an update for the "How to get perfect shapes on your nails" Post (original). It's a much simpler design and has very easy to follow steps. 


I also created this little mini quick reference "cheat sheet" for the steps. 


These are the materials you will need. Hole Puncher(s) I found smaller heart one at the dollar store, Nail polishes and masking tape (painters tape works also and I find it easier to work with thin tape).


Paint your nails with the base color you chose. Let them dry completely! This is important because you avoid smudges. 


Punch out your shape with the hole puncher. It may be tricky because of the stickiness of the tape, just be gentle when tugging. Then attach the tape to your nail firmly, you want to prevent the polish from bleeding. 


Apply polish over your shape. Gently pull off the tape before it dries. Be fun and creative in this step, add dots, glitter, leopard print anything that comes to mind in this step. Its easy to do it because the masking tape is covering the nail and its almost impossible to mess up! I stayed simple for this tut. 


Apply your top coat and you're done! 


Here is a close up look of the heart with the glitter. 

Another close up.

Monday, July 23, 2012

Floral and Lace Jewelry Holder and Wall Art


I first saw this tutorial on Pinterest. I fell in love with it! I thought what a clever and cute way to display jewelry and use as wall art. Here is my version of the lace jewelry holder. I made a mini tutorial for it. 


Here is what you will need. One Embroidery Hoop (your choice of size they come super small and super big), Paint (color that tickles your fancy- I used Acrylic paint),  Fabric, Lace, trimming (I used a rhinestone trim) not pictured- a paint brush, fabric scissors and a hot glue gun.


Paint your Hoop. You only need to paint the outside hoop, but if you prefer (or are doing this without the background fabric, then paint both) 


Fit both the fabric and lace over the inside smaller hoop. Place the larger hoop over all the fabric, and tighten the screw on top. Pull the fabrics from the back, gently, so they are snug and firm. 


Then, I trimmed off all the excess fabric with my fabric scissors. (Make sure you use fabric scissors or really sharp ones so you have a clean edge) You can leave it just like this, if you want. It's super cute as is. But I love sparkle and wanted to add some rhinestone trim to it. 


I used a hot glue gun and went around the hoop slowly adhering the trim. 


Here is how it looks from the side. 


and Viola! A Cute Floral and Lace Jewelry Holder. 


Here is a close up shot- it is great to use as a background for jewelry shots too! 


Tuesday, July 17, 2012

Birthday Nail Art Wheel

Fun Birthday themes nail art wheel. I'm still practicing my Nail Art pen skills so there are a few squiggly lines, or dots to close to each other but overall I am thrilled with these designs!

Sunday, July 15, 2012

Leopard Print with Gold French and Stripes


This is my favorite set of nails that I've done. Varying shades of pinks with gold and glitter. If you want to see more of my nail designs I usually post tons of them on Instagram. Find me under SellzCuteThings.

Saturday, July 14, 2012

FishTail Nails

I am absolutely in love with Fishtail nails. They are super easy to do and look like they took ages to create! I used this tutorial. 


Below is a Fishtail Nail wheel I made of a bunch of my favorite colors. I hope you like it! 


Monday, March 12, 2012

Cute Crochet Pink Bow iPhone Cozy (case)

My iPhone has been begging for a cute case...I've searched and searched and couldn't find one I was happy with, so I made one. Here she is....
Crochet Bow iPhone Case Cozy Easy Pink
I made a tight gray case- all single stitches. Then made a huge pink bow for the middle of it. I am going to use clear thread to stitch the bow ends down- they keep flipping up a bit. Below is a picture of it with some sparkles using the photo glitter app. 

Sunday, March 11, 2012

Tutorial How to make Crochet Bow Ring


A young lady named Camila asked me to create a tutorial for this cute crochet bow, and here it is! It's my first official tutorial, so if anything seems confusing or you think I missed a step please email me and I will try to help you out! In order to make this you need to know the very basic steps to crocheting. Here is a link to The Lion Brand Yarn "Learn to Crochet" page. I think they have great visuals. You can also check out youtube for more videos. (I also found the Klutz crochet book VERY useful, but as of the time of this post, it was no where on their website for purchase- might want to try ebay or amazon?) This is a super easy project and is great for all ages and skill levels. These are also the same steps I used to make the Crochet Bow Bracelet. 

Here goes....


These are your materials. You need 28 Gauge wire, you choice of color, (It can be found at your local jewelry or craft store) Wire cutters, and a crochet hook (I used size E4-3.5MM). 


Start by making a slip knot. 


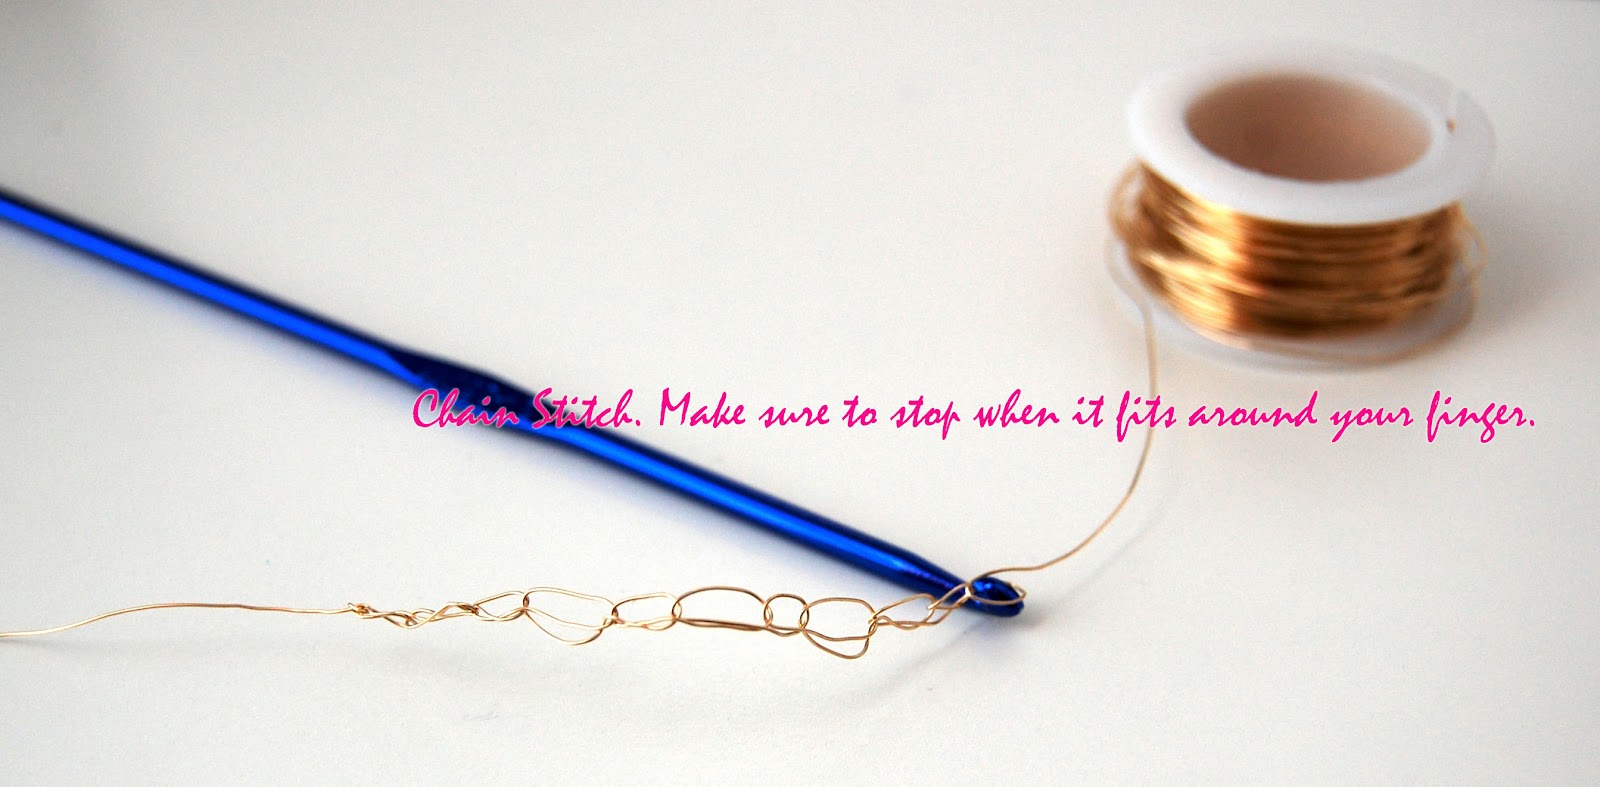
Chain a few stitches. You need the length that will fit around your finger, so you need to measure it (around your finger). This will vary for everyone so I don't have a specific number to give you. Your stitches do not need to be perfect, thats the beauty of the project. As you can see in the picture my chain stitches were all slightly different sizes. It will give the ring personality. (If you are making the bracelet, increase the amount of chain stitches here, enough to fit over and on your wrist)


Turn your work, and single crochet into the whole chain you just made. This will make the band less flimsy. When you have reached the end, snip off the wire but leave about a three inch tail.  


Now lets join both ends of the band. lightly twist the two wires together (Do not- and I can't stress this enough- twist the strands too much, they will break off, it happened to me and made me pout). 


Here is what it looked like after I pulled the wire through, now we will begin to wrap this long wire around the band. 


Give it a firm tug every time you wrap the wire around. Wrap it a few times, I did about five turns. Make sure it is snug so it stays in place. 


Now lets start the bow. We will start the same way you did the band, with the chain stitch. Chain it to your desired length, keeping in mind the more chain stitches the longer the bow will be on your finger, and the less chain stitches the smaller it will be. I suggest at least six chain stitches. When you are done with your chain stitches you will turn your work and start making a few rows of single crochet stitches. 


Here is a tip for working with the wire which can get pretty unruly. Pull off about six inches of wire (at a time) and then slip it through that small slit that (hopefully) came with your wire spool If you don't have a slit, take some tape and tape it down. 


Check to make sure you are happy with the length, width and height of the rectangle. I only did two rows of single crochets here, but prefer it with three rows. (as with THIS ring- Oh and by the way, feel free to click "Like" while there!) When you are happy with the size of your rectangle, fasten it off and cut off the wire with your wire cutters.


Lets hide those loose ends. Simply string them into the rectangle, they will camouflage right in. 


When you string them in a few times, snip off the ends and you might be left with a sharp little piece of wire. You can either; use a nail file to file it down and smooth it out, or use your fingers to bend the tip and curve it so it can no longer poke you (I just bend the wire with my finger). 


This is what you should have now. 


Shape the rectangle into a bow. Pinch the middle and round out the edges. Play with it until you are satisfied with its shape. 


Cut off some wire (about 10 inches) and wrap it around the pinched portion of the bow a few times. Leave some wire for the next step. 


Lets attach the bow to the band. It can feel a little tricky to do this so I shared some pictures of how I hold it. 


Side view of how I hold it. Not too hard right? 


Now get wrapping...wrap wrap wrap. You should be a pro at wrapping by now. 


Cut off whatever wire is left, smooth out the wire tip(s) you just cut (using whatever method you used before) and Viola! you're done. Wasn't that easy? Now go ahead, you deserve to show off your ring and gloat a little about the fact that you made it. 


XoXo, Sellz

Monday, March 05, 2012

Easy Gold Crochet Bow Bracelet

Crochet Bow Bracelet Easy
I made the gorgeous Crochet Bow Bracelet after I saw something similar in a magazine. For the life of me I can't figure out which magazine I saw it in, but if I find it I promise to upload a pic and show you how similar it is. I used 28 Gauge wire and started with the bow....
Crochet Bow Bracelet Easy

I crocket a rectangle for the bow. The height of the bow depends on you, add more rows for a bigger bow, less for a smaller one, but I would use at least four rows to get a "fluffy" looking bow. I finished off the end of the rectangle and strung it into the edges. I then used some wire to wrap around the middle and pinch it. Finally slide some wire through the middle of the back of the bow and begin to make a long chain- long enough to fit over your hand and fit snuggly on your wrist. I single crocheted into every chain stitch to make it a thicker, more durable band. Finish off the end and then string the left over wire into the bracelet band. It's a quick written explanation of how to make this bracelet, if you would like more details, don't hesitate to email me! Sellz@SellzCuteThings.com XoXo

Monday, January 30, 2012

Animal Print Wall Art

I found this CUTE pack of animal print paper at Michaels. I took out one sheet of the ones that stood out to me most and decided to redo a canvas I messed up a couple of weeks ago. I cut each 12x12 paper into 3in by 3in squares. I used modpodge and a foam brush to adhere them to the canvas and to later seal them into place. I got a few air bubbles so I recommends using a popsicle stick or something to smooth down each each square. Below is a picture of all my little squares lined up.


Animal Print Scrapbook Paper Canvas
and Viola! The finished piece. Isn't it cute?

Animal Print Wall Art Decor

I finished this off with a coat of sparkle mod podge (as we know I add glitter to Ev.ERy.Thing!) I also used black acrylic paint for the edges. Do you like it?!